Milvus Unleashed: A First Dive into Vector Databases
Milvus is a powerful open-source vector database that excels at managing unstructured data such as images, video, and audio. This article explores Milvus's capabilities, including an image similarity search use case using Python.

Welcome to a new article in this series, where we will explore databases for different use cases that aren't part of the "mainstream" names we're used to hearing. In this first edition, we'll start with Milvus. Why Milvus? Well, to be honest, my experience with vector databases is somewhat limited, and I've been hearing a lot about this one, so I think it's a good place to begin.
What's Milvus?
Milvus is an open-source vector database designed to handle massive amounts of unstructured data. Think of it as a specialized tool for managing and searching data like images, videos, and even audio files, which are usually hard to organize in traditional databases. It's built for scenarios involving machine learning, artificial intelligence, and similarity searches—basically, anytime you need to efficiently find relationships or patterns in complex data. With its powerful indexing and fast querying capabilities, Milvus makes working with large-scale, unstructured data a lot more approachable, even if you're just starting out.
Typical Use Cases for Milvus
Milvus shines in situations where you need to deal with unstructured data, especially when it comes to similarity searches. Here are some typical use cases:
- Image and Video Search: Imagine you have a huge collection of images or videos, and you want to find items that look similar. Milvus can help you efficiently search for visually similar content, making it great for applications like visual search engines, digital asset management, or content recommendation.
- Recommendation Systems: By storing vector embeddings of user behavior or product features, Milvus can power recommendation engines that provide personalized suggestions, such as for e-commerce or media streaming platforms.
- Natural Language Processing (NLP): Milvus can be used for semantic searches in text. If you convert text data into vectors, you can then use Milvus to perform searches that understand the meaning of the content, which is particularly useful in chatbots, customer support, or document retrieval systems.
- Anomaly Detection: Milvus is effective for finding unusual patterns or outliers within large datasets. For example, in cybersecurity, you can use Milvus to detect anomalies in network traffic by searching for unusual data patterns.
- Genomics and Medical Data: Handling massive, complex datasets like DNA sequences or medical imaging can benefit from Milvus's ability to find similarities. This makes it a valuable tool for research and diagnostic purposes.
- Audio and Speech Recognition: Similar to image and NLP tasks, Milvus can also store and search audio features, helping in applications like voice recognition, audio classification, or music recommendation systems.
Let's deploy
For me, the best way to learn is trying, breaking and fixing is how works for me. Also, replicating use cases is quite useful for learn new things.
Said this, let's start "breaking" deploying an instance of Milvus using Docker through a script that they provide in the documentation website:
$ curl -sfL https://raw.githubusercontent.com/milvus-io/milvus/master/scripts/standalone_embed.sh -Then
sh ./standalone_embed.sh startYou should see something like this:
Unable to find image 'milvusdb/milvus:v2.4.13-hotfix' locally
2024/10/17 11:18:41 must use ASL logging (which requires CGO) if running as root
v2.4.13-hotfix: Pulling from milvusdb/milvus
9b10a938e284: Pull complete
72d6e057bd66: Pull complete
1db49fab89e3: Pull complete
9ab0fe5697fd: Pull complete
149e2d21f99f: Pull complete
7191be017dba: Pull complete
Digest: sha256:7a4fb4c98b3a7940a13ceba0f01429258c6dca441722044127195ceb053a9a86
Status: Downloaded newer image for milvusdb/milvus:v2.4.13-hotfix
Wait for Milvus Starting...
What we are doing here? This setup is configuring a simple standalone Milvus environment with the necessary etcd service for metadata management. Milvus is run in a standalone mode, which is ideal for testing or small-scale use cases since it is easy to set up compared to distributed mode.
If everything is going well you should see something like this when you run `docker ps`
CONTAINER ID   IMAGE                            COMMAND                  CREATED          STATUS                    PORTS                                                                      NAMES
2cc4e66b3938   milvusdb/milvus:v2.4.13-hotfix   "/tini -- milvus run…"   56 seconds ago   Up 55 seconds (healthy)   0.0.0.0:2379->2379/tcp, 0.0.0.0:9091->9091/tcp, 0.0.0.0:19530->19530/tcp   milvus-standalone
Another check to see if everything is running as expected can be browsing http://localhost:9091/healthz that should return an 'Ok'
Let's get the fun started
Let's dive into a practical use case to showcase the power of Milvus: an Image Similarity Search. In this example, we'll build a system that allows users to find visually similar images from a large collection. This use case is a perfect way to illustrate Milvus's capabilities with unstructured data.
First, we need to make a few things:
- Collect the Dataset: We'll use the CIFAR-10 dataset, which contains 60,000 images in 10 classes, with 6,000 images per class. It's a great dataset for testing out image similarity.
- Generate Image Embeddings: To search for similar images, we'll convert the CIFAR-10 images into vectors (embeddings) using a pre-trained model like ResNet.
- Store Embeddings in Milvus: Once we have the embeddings, we'll store them in Milvus for fast retrieval.
- Query Milvus for Similar Images: Finally, we'll use Milvus to query and find images that are most similar to a given input image.
For simplicity purposes, I'm grouping all the functions in a Python script but let me explain each step:
In the step one, the script is going to create the connection to Milvus, then, we are going to create a collection in the database, the next step is generate the embeddings, load the dataset and search for similarities.
import numpy as np
import torch
import torchvision.models as models
import torchvision.transforms as transforms
import torchvision.datasets as datasets
from pymilvus import connections, Collection, CollectionSchema, FieldSchema, DataType

# Step 1: Connect to Milvus
connections.connect("default", host="localhost", port="19530")

# Step 2: Create a collection in Milvus
fields = [
    FieldSchema(name="image_id", dtype=DataType.INT64, is_primary=True, auto_id=True),
    FieldSchema(name="embedding", dtype=DataType.FLOAT_VECTOR, dim=512)
]
schema = CollectionSchema(fields, "Image similarity search collection")
collection = Collection("image_similarity", schema)

# Step 3: Load ResNet model for generating embeddings
model = models.resnet18(weights=models.ResNet18_Weights.IMAGENET1K_V1)  # Update for torchvision v0.13+
model = torch.nn.Sequential(*list(model.children())[:-1])  # Remove the classification layer
model.eval()

transform = transforms.Compose([
    transforms.Resize((224, 224)),
    transforms.ToTensor(),
    transforms.Normalize(mean=[0.485, 0.456, 0.406], std=[0.229, 0.224, 0.225]),
])

# Step 4: Load CIFAR-10 dataset
cifar10 = datasets.CIFAR10(root="./data", train=False, download=True, transform=transform)

# Insert embeddings into Milvus
for idx in range(len(cifar10)):
    image, _ = cifar10[idx]
    image_tensor = image.unsqueeze(0)

    with torch.no_grad():
        embedding = model(image_tensor).squeeze().numpy()
        embedding = embedding.flatten()

    # Insert data into Milvus
    collection.insert([
        [embedding.tolist()]
    ])

# Step 4.5: Create an index for the collection
index_params = {
    "index_type": "IVF_FLAT",
    "params": {"nlist": 128},
    "metric_type": "L2"
}
collection.create_index(field_name="embedding", index_params=index_params)

collection.load()

# Step 5: Search for similar images
query_embedding = embedding  # Replace with an embedding of the image you want to search for
search_params = {"metric_type": "L2", "params": {"ef": 128}}
results = collection.search([query_embedding], "embedding", param=search_params, limit=5, output_fields=["image_id"])

for result in results[0]:
    print(f"Found similar image with ID: {result.id} and distance: {result.distance}")
Running this, can be intensive for your computer, in my case with a M3 Pro Max, was the first time that I heard the fans running, also, depending of the large of the datasize can take some time.
Once the ingesting of the data is done and the search go through, we should have a result like this:
Found similar image with ID: 453292799976041682 and distance: 0.0
Found similar image with ID: 453292799976061682 and distance: 0.0
Found similar image with ID: 453292799976029238 and distance: 170.8767852783203
Found similar image with ID: 453292799976049238 and distance: 170.8767852783203
Found similar image with ID: 453292799976023594 and distance: 208.214111328125
But, Ignacio, what does this mean?
The output that we received indicates that Milvus found a set of images similar to the query image, ranked by their distance:
- ID and Distance: The
IDis a unique identifier for each image, and thedistanceis a measure of similarity. Lower distance values indicate greater similarity.
- The result with
distance: 0.0means that the image is identical to the input image (since it’s a self-match). - The other results have positive distances, meaning they are similar to the input image but not identical. The larger the distance, the less similar the image is.
In our case:
- The first two results have a distance of
0.0, indicating they are identical to the query image. - The other results have distances like
170.876and208.214, which means they are the most similar but not exact matches.
The concept here is to use vector similarity (in this case, the L2 distance metric) to find images that are close in the feature space. Lower values indicate higher similarity, which helps to find relevant matches in an image similarity search.
But, for being more visual, let's tweak the code to add matploblib to see this similarities in a more graphical way:
import numpy as np
import torch
import torchvision.models as models
import torchvision.transforms as transforms
import torchvision.datasets as datasets
from pymilvus import connections, Collection, CollectionSchema, FieldSchema, DataType
import matplotlib.pyplot as plt

# Step 1: Connect to Milvus
connections.connect("default", host="localhost", port="19530")

# Step 2: Create a collection in Milvus
fields = [
    FieldSchema(name="image_id", dtype=DataType.INT64, is_primary=True, auto_id=True),
    FieldSchema(name="embedding", dtype=DataType.FLOAT_VECTOR, dim=512)
]
schema = CollectionSchema(fields, "Image similarity search collection")
collection = Collection("image_similarity", schema)

# Step 3: Load ResNet model for generating embeddings
model = models.resnet18(weights=models.ResNet18_Weights.IMAGENET1K_V1)  # Updated for torchvision v0.13+
model = torch.nn.Sequential(*list(model.children())[:-1])  # Remove the classification layer
model.eval()

transform = transforms.Compose([
    transforms.Resize((224, 224)),
    transforms.ToTensor(),
    transforms.Normalize(mean=[0.485, 0.456, 0.406], std=[0.229, 0.224, 0.225]),
])

# Step 4: Load CIFAR-10 dataset
cifar10 = datasets.CIFAR10(root="./data", train=False, download=True, transform=transform)

# Store original images for visualization
original_images = datasets.CIFAR10(root="./data", train=False, download=True)

# Insert embeddings into Milvus
for idx in range(len(cifar10)):
    image, _ = cifar10[idx]
    image_tensor = image.unsqueeze(0)

    with torch.no_grad():
        embedding = model(image_tensor).squeeze().numpy()
        embedding = embedding.flatten()

    # Insert data into Milvus
    collection.insert([
        [embedding.tolist()]
    ])

collection.load()

# Step 5: Search for similar images
query_embedding = embedding  # Replace with an embedding of the image you want to search for
search_params = {"metric_type": "L2", "params": {"ef": 128}}
results = collection.search([query_embedding], "embedding", param=search_params, limit=5, output_fields=["image_id"])

# Step 6: Display the similar images
fig, axes = plt.subplots(1, len(results[0]), figsize=(15, 5))

for idx, result in enumerate(results[0]):
    image_id = result.id
    distance = result.distance

    # Since we use auto_id, the image_id corresponds to the index in the CIFAR-10 dataset
    original_image, _ = original_images[image_id % len(original_images)]

    axes[idx].imshow(original_image)
    axes[idx].set_title(f"ID: {image_id}\nDistance: {distance:.2f}")
    axes[idx].axis('off')

plt.tight_layout()
plt.show()
Let's run the script again and we should see something like this:

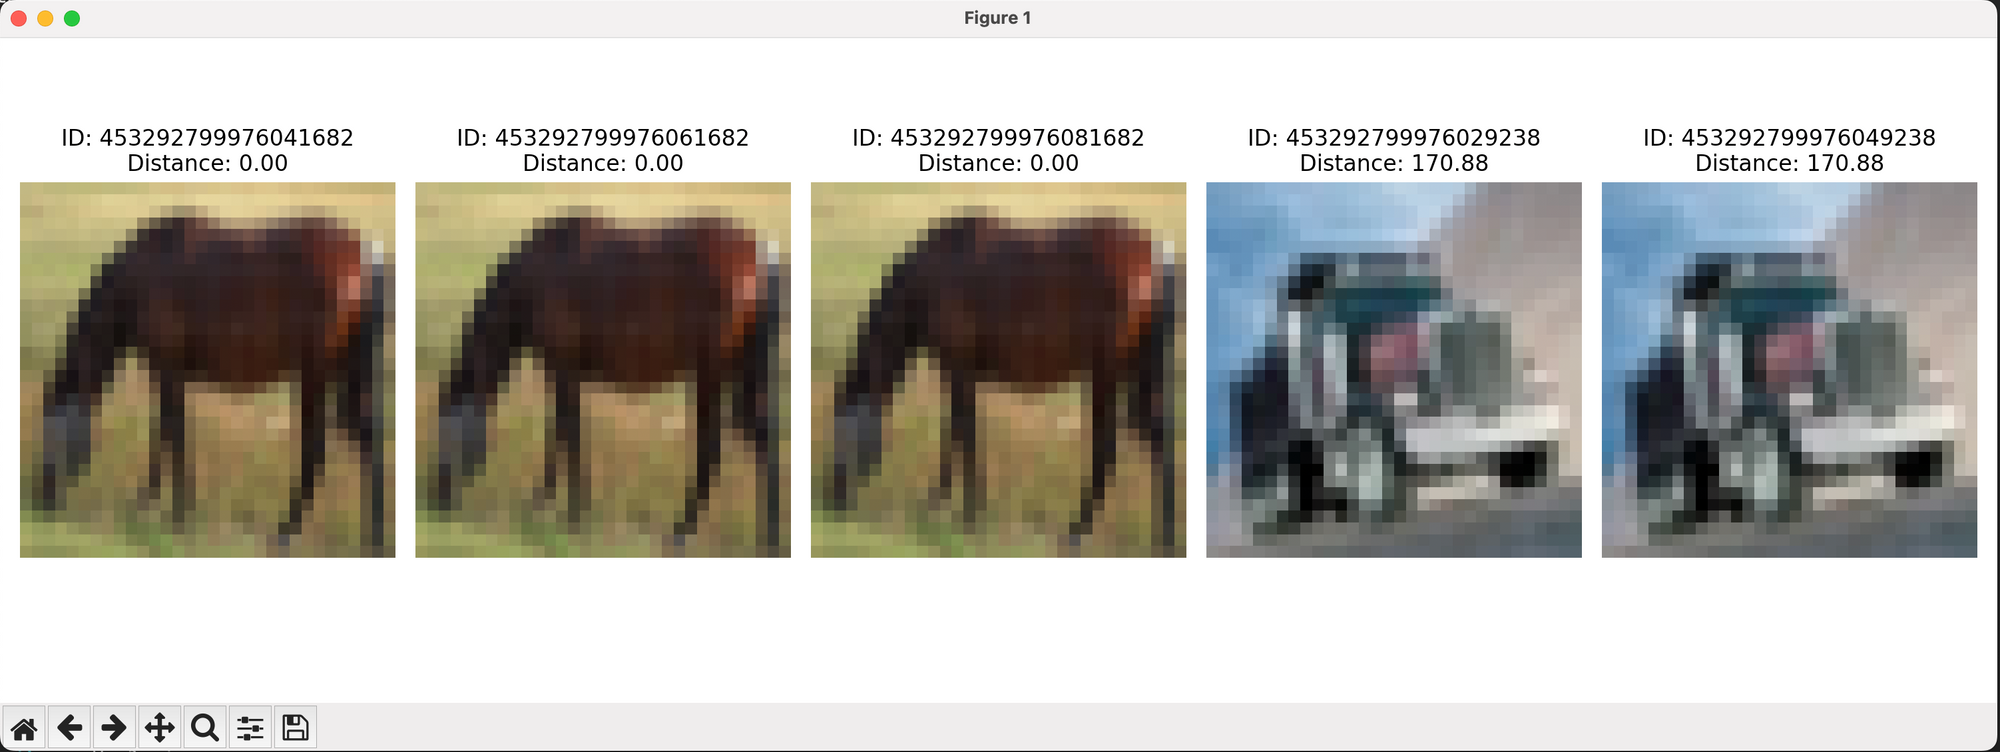
In this case, we can see that three images were detected as being identical to each other, and then we have the truck, which differs from the horse images. Now, we could dive deeper into understanding why these specific images were selected over others, but I think that would be interesting for another article on context and visual features versus semantic understanding.
To Conclude
We explored what Milvus is, its use cases, and how it works using Python. In this example, we chose a dataset of 6,000 images to find matches. Now, imagine other use cases that could benefit from this kind of technology—what pops into your mind right now? I'd love to read your thoughts in the comments below.


